

Creating a yardstick buffet DIY project is one of the most creative ways to upcycle vintage materials and breathe new life into old furniture. If you’re looking for an innovative upcycling project that combines rustic charm with modern design, a yardstick buffet is the perfect solution. We recently discovered Laura’s incredible transformation of a basic buffet using antique yardsticks, and it’s a stunning example of how simple materials and creativity can result in a show-stopping piece of furniture.
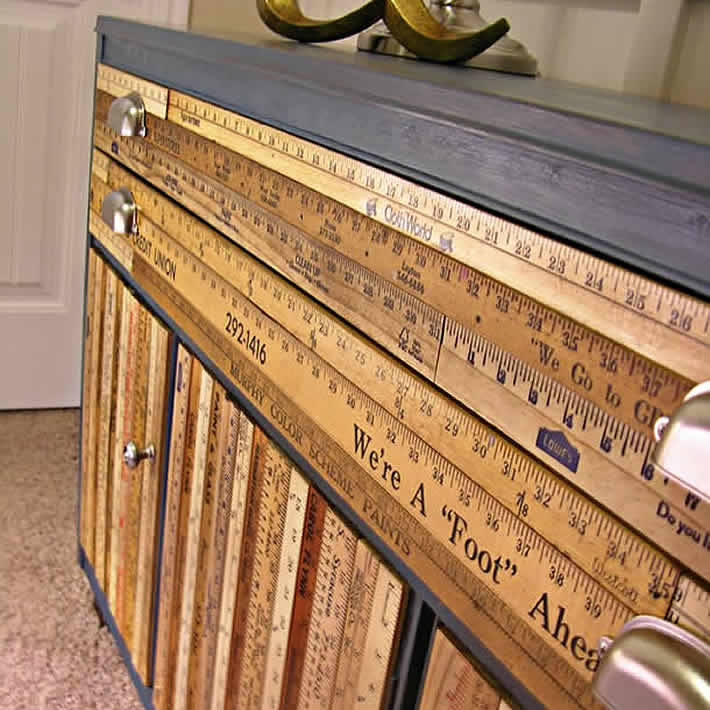
A yardstick buffet is essentially a furniture piece that has been given a complete makeover by covering its front with vintage or antique yardsticks. These measurement tools, typically found at thrift stores and antique shops, bring a wonderful sense of nostalgia and visual interest to any piece of furniture. The beauty of this yardstick buffet DIY approach lies in the natural variations in wood color and patina—each stick tells its own story.
Sourcing Your Materials
The first step in any yardstick buffet DIY project is gathering your supplies. Laura found her yardsticks at antique-style stores, where they’re often plentiful and affordable. When selecting yardsticks, look for ones with interesting markings and varied ages, as this will create the beautiful striped effect that makes the finished project so visually appealing. You’ll also need:
- An old buffet or similar furniture piece
- Antique yardsticks in various conditions
- Liquid nails adhesive in a caulk gun
- Nails and a hammer
- Restoration oil
- Lint-free cleaning cloths
- Sandpaper and paint (optional for preparation)
- New decorative hardware/pulls
Preparing Your Buffet
Before you start attaching any yardsticks, it’s essential to prepare your furniture piece properly. Begin by removing all existing hardware, including old pulls and any unnecessary embellishments. Once stripped down, thoroughly clean the buffet surface and sand it lightly to create a good base for adhesion. If desired, you can paint the buffet to refresh its appearance before adding the yardsticks.
How to Attach Yardsticks to Your Buffet
According to Laura’s proven method for creating a stunning yardstick buffet DIY transformation, the attachment process is straightforward but requires patience. Here’s her step-by-step approach:
Step 1: Apply Adhesive
Use liquid nails in a caulk gun to apply a generous adhesive layer to the back of each yardstick before positioning it on the buffet. This creates a strong bond between the wood sticks and your furniture piece.
Step 2: Secure with Nails

Once the yardsticks are positioned, nail down the ends of any sticks that aren’t lying perfectly flat. This extra security ensures that your project will last for years to come.
Step 3: Allow Adhesive to Cure
Patience is key—let the liquid nails dry completely before moving forward. This typically takes 24 hours, depending on your specific product.
Step 4: Apply Restoration Oil
Once the adhesive is fully dry, use a lint-free cloth to apply restoration oil across all the yardsticks. This step is magical—it will enhance the natural colors and create that beautiful striped effect. Older yardsticks will develop a rich, dark patina, while newer ones will show minimal color change, resulting in a lovely visual contrast across your piece.
The Finishing Touch
The final step in your yardstick buffet DIY project is installing new decorative hardware. Fresh pulls or handles give your buffet a polished, completed look and make it fully functional. Choose hardware that complements your home’s style—vintage brass pulls work beautifully with the rustic aesthetic of the yardstick design.
Why This DIY Project Works
This upcycling project is popular among DIY enthusiasts because it transforms an ordinary piece of furniture into a conversation starter. The yardstick buffet DIY approach celebrates imperfection and the natural aging process of vintage materials. It’s also incredibly satisfying—you’re creating functional storage with personality and character.
For a complete tutorial and more detailed instructions on creating your own yardstick buffet, visit Corner House’s full yardstick buffet tutorial. Laura’s expertise and beautiful photography will guide you through each step of the process.
Whether you’re an experienced DIYer or just starting your upcycling journey, this project is manageable and incredibly rewarding. Head to your local antique shop, find some vintage yardsticks, and give your old furniture a transformation it won’t forget!
For more creative furniture upcycling ideas, explore our furniture upcycling projects.
Design by Corner House
Since you’re here …
I have a small favor to ask. Thousands are visiting upcycleDZINE for upcycle design inspiration every month. Readers in more than 100 countries around the world are now able to support financially.
upcycleDZINE is a completely independent niche site, is very work-intensive, and offers tons of unique information for free.
To keep upcycleDZINE running, I’m asking you for your support.
Your contribution will allow me to:
– meet the hosting costs
– upgrade to keep track of traffic increases
– add new content, and keep improving the older content
– add new functionalities to this site
– improve how it works and how it looks
– and last but not least, my daily dose of coffee 🙂
Again, all contributions will be reinvested into the aforementioned associated costs of running this blog and will help ensure the ongoing quest for quality upcycle design.
Your kindness and generosity will be greatly appreciated and will give me the motivation to continue.
Every contribution, however big or small, is so valuable for the future of upcycleDZINE.
Support today from as little as $2 – it only takes a minute. Thank you.