


Creating a stunning DIY milk carton lampshade project is easier than you think, and it’s one of the most satisfying ways to upcycle household waste. I recently made a beautiful pendant and floor lamp called the MilkWheel using discarded plastic milk cartons—and the results are absolutely stunning. After making other upcycled lampshades using the side parts of milk cartons, I had all the top pieces left over. Rather than tossing them, I decided to transform these scraps into something brilliant. The MilkWheel is a versatile design that works equally well as a pendant lamp or floor lamp, and the best part? You can customize it endlessly by screwing the caps back on in different configurations.
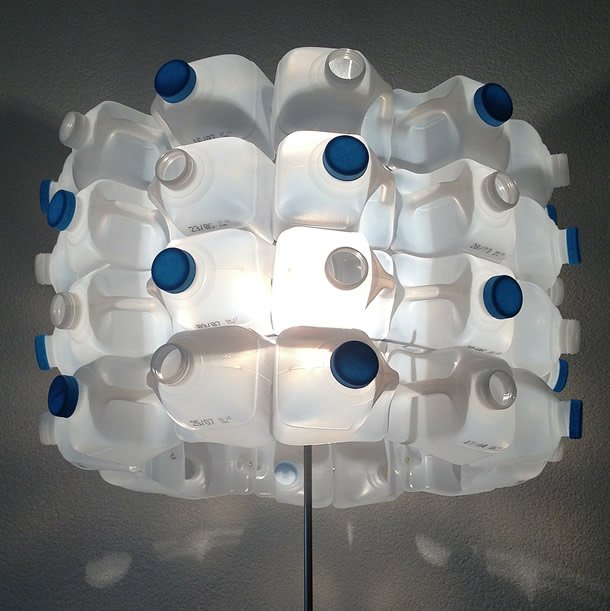
Milk cartons are perfect for this milk carton lampshade DIY project because they’re sturdy, translucent, and abundant in most households. Rather than sending them to the landfill, you can transform them into functional art. The plastic material diffuses light beautifully, creating a warm glow that’s perfect for any room. Plus, creating your own lampshade means you have complete control over the design, size, and aesthetic—making it truly one-of-a-kind.
Materials You’ll Need
Before you start your milk carton lampshade DIY project, gather these supplies:

- 48 plastic milk cartons (plus 1 spare for mistakes)
- Small snap-off blade knife
- Scissors
- Eyelet Crimping and Hole Punch Function Pliers
- Metal eyelets
- Lamp frame (40 cm diameter works well, adjust to your preference)
- Tie-wraps (20 cm length, approximately 3 mm width)
Step-by-Step Instructions
Preparing Your Milk Cartons
Start by cleaning and drying your milk cartons thoroughly. Using your small snap-off blade knife, carefully cut away the pieces you need. For the MilkWheel design, you’ll be using the top cap portions of the cartons. Cut them into uniform pieces—consistency is key to achieving that polished look. This is where patience pays off; take your time to ensure clean, straight cuts.
Creating the Rows
Once you have your cut pieces, it’s time to join them together. Use your eyelet crimping pliers to punch holes in strategic points on each piece. Then, insert metal eyelets into these holes. This allows you to connect multiple pieces in long rows. You can make these rows as long as you want, depending on your desired lamp size and the diameter of your frame. The eyelets create secure, decorative connections that add visual interest to your design.

Assembling the Drum Shape
After creating all your rows, begin combining them into a drum-like cylindrical shape. This is where your design comes together! The circular form not only looks elegant but also distributes light evenly. Use your tie-wraps to hold the structure together at intervals, ensuring everything stays aligned. You can adjust the tightness to get the perfect shape before finalizing everything.
Attaching the Lamp Frame
The final step involves inserting your lamp frame inside the drum structure. This provides the essential support for your milk carton lampshade DIY project and allows you to mount it as a pendant or floor lamp. Secure it carefully, ensuring it’s centered and stable. Test the structure before declaring your project complete.
Customization and Variations

What makes this milk carton lampshade DIY so special is the endless customization potential. You can use the milk carton caps to screw them back on in different patterns, creating unique designs each time. Try alternating colors, adjusting the spacing between pieces, or creating gradient effects with caps of different shades. There are truly lots of variations to be made!
Final Thoughts
Like other upcycle design lampshades, the MilkWheel is reasonably easy to make, though it does require patience and time. The satisfaction of transforming plastic waste into a functional work of art is well worth the effort. Not only do you end up with a beautiful piece for your home, but you’re also making a positive environmental impact by keeping plastic out of landfills.
I encourage you to try this project yourself and share your results with me. Have fun, get creative, and don’t be afraid to experiment with your own variations. Upcycling is all about seeing potential in the things we discard!
Design by Gilbert de Rooij | Photos © Gilbert de Rooij
Since you’re here …
I have a small favor to ask. Thousands are visiting upcycleDZINE for upcycle design inspiration every month. Readers in more than 100 countries around the world are now able to support financially.
upcycleDZINE is a completely independent niche site, is very work-intensive, and offers tons of unique information for free.
To keep upcycleDZINE running, I’m asking you for your support.
Your contribution will allow me to:
– meet the hosting costs
– upgrade to keep track of traffic increases
– add new content, and keep improving the older content
– add new functionalities to this site
– improve how it works and how it looks
– and last but not least, my daily dose of coffee 🙂
Again, all contributions will be reinvested into the aforementioned associated costs of running this blog and will help ensure the ongoing quest for quality upcycle design.
Your kindness and generosity will be greatly appreciated and will give me the motivation to continue.
Every contribution, however big or small, is so valuable for the future of upcycleDZINE.
Support today from as little as $2 – it only takes a minute. Thank you.











I love it Gilbert. What do you use to cut the plastic so straight?
I have a bunch of plastic containers waiting to be used as concrete molds for my lamps, might as well try this…I don’t know if the US is ready for this though…
Hi Jay,
Thanks for your compliment.
See the tutorial on how to cut it. I used a template made from a part of the carton and took a snap-off blade knife and scissors.
Looking forward to your version. Success!