

A DIY tyre ottoman is one of the most creative and rewarding upcycling projects for turning discarded materials into functional home décor. If you’ve got an old tyre lying around and you’ve been searching for an ottoman, you’re in luck! This fantastic DIY tyre ottoman project combines sustainability with style, transforming something destined for the landfill into a unique piece of furniture you’ll love. The beauty of this project is that it requires minimal materials—just an old tyre, some rope, and a bit of creativity—making it perfect for budget-conscious and eco-minded crafters.
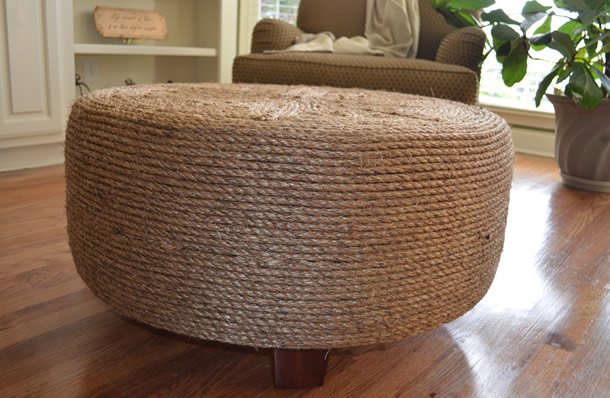
Creator Nikki first shared this brilliant idea on her blog ‘That Was a What?’, showcasing how to turn a discarded tyre into an awesome ottoman. Her design was so popular and well-received that Nikki decided to turn her passion into a business called Home Attire, where she now creates and sells handmade tyre ottomans. What started as a creative DIY project has become a testament to how upcycling can be both personally fulfilling and commercially viable. Nikki even created an ebook tutorial available for download, allowing others to master the craft themselves.
Materials You’ll Need for Your DIY Tyre Ottoman
Creating a DIY tyre ottoman requires surprisingly few supplies, which is part of what makes this project so accessible:
- One old tyre (any size, depending on your desired ottoman dimensions)
- Natural sisal rope or jute twine
- Strong adhesive or rope ties
- Optional: cushion filling and fabric for the top
- Scissors or utility knife
The rope wrapping is what transforms the tyre from a recycled car part into an attractive piece of furniture that fits any interior style. The natural texture of sisal or jute creates a warm, eco-friendly aesthetic that appeals to anyone interested in sustainable living.
Step-by-Step DIY Tyre Ottoman Construction
While the concept is simple, executing your DIY tyre ottoman requires patience and attention to detail. Start by thoroughly cleaning your old tyre to remove any dirt, debris, or chemical residue. Once clean and dry, begin wrapping your rope tightly around the tyre, working from bottom to top. Make sure each layer is snug and evenly spaced to create a neat, professional appearance.
Securing the Rope
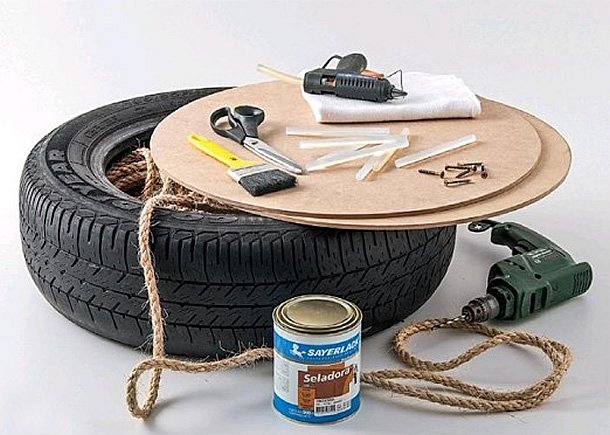
The key to a long-lasting tyre ottoman is securing the rope properly. You can use strong waterproof adhesive to bond each layer, or opt for rope ties through any existing holes in the tyre. Many crafters prefer using hot glue guns or construction adhesive, applying small amounts as they wrap to ensure the rope stays in place without creating bulky seams.
Adding the Top
Once you’ve wrapped the entire tyre, consider adding a cushioned top to make your ottoman more comfortable. You can use upholstery foam and fabric that matches your home décor, or keep it simple with a decorative round cushion placed on top. This finishing touch transforms your piece from a novelty item into a genuinely functional piece of furniture.
Inspiration From Other Creators
Beyond Nikki’s original design, there are countless variations of this upcycling concept. Minha Casa features beautiful photography of another tyre ottoman project that demonstrates various wrapping techniques and rope patterns, giving you multiple design inspiration options for your own creation.
Why Choose a DIY Tyre Ottoman?
This project embodies everything the upcycling community loves: sustainability, creativity, cost-effectiveness, and practical results. Old tyres are a massive global waste problem, with millions ending up in landfills each year. By converting even one tyre into furniture, you’re making a small but meaningful environmental impact. Plus, your handmade ottoman becomes a conversation starter—a unique piece that tells a story about resourcefulness and sustainable living.
Get Started With Your Own Project
Whether you’re an experienced DIY enthusiast or trying your first upcycling project, a tyre ottoman is achievable and rewarding. Head to That Was a What? for detailed inspiration, or purchase Nikki’s complete ebook guide for step-by-step instructions. Your new sustainable ottoman awaits!
Design by Nikki
Since you’re here …
I have a small favor to ask. Thousands are visiting upcycleDZINE for upcycle design inspiration every month. Readers in more than 100 countries around the world are now able to support financially.
upcycleDZINE is a completely independent niche site, is very work-intensive, and offers tons of unique information for free.
To keep upcycleDZINE running, I’m asking you for your support.
Your contribution will allow me to:
– meet the hosting costs
– upgrade to keep track of traffic increases
– add new content, and keep improving the older content
– add new functionalities to this site
– improve how it works and how it looks
– and last but not least, my daily dose of coffee 🙂
Again, all contributions will be reinvested into the aforementioned associated costs of running this blog and will help ensure the ongoing quest for quality upcycle design.
Your kindness and generosity will be greatly appreciated and will give me the motivation to continue.
Every contribution, however big or small, is so valuable for the future of upcycleDZINE.
Support today from as little as $2 – it only takes a minute. Thank you.