

Looking for creative paper clip chandelier DIY inspiration? When January rolls around and darkness falls early in the afternoon, having beautiful lighting around your home becomes essential for creating a warm atmosphere. Instead of heading to the store to buy a new lamp, why not make your own? This stunning paper clip chandelier is the perfect DIY upcycling project that transforms humble office supplies and vintage lamp parts into an eye-catching centerpiece. The original design comes from Re:Design Technologies, a studio dedicated to redesigning the home environment while minimizing human impact on our natural world.
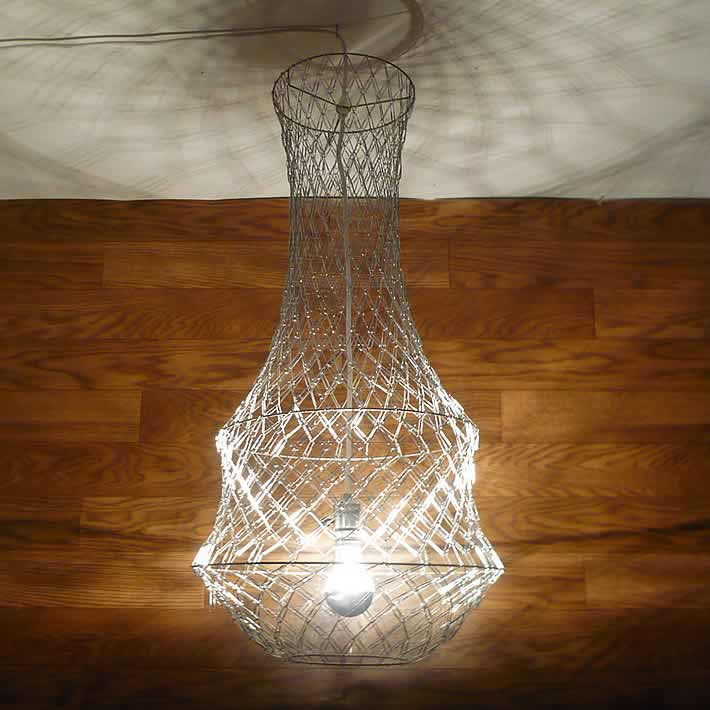
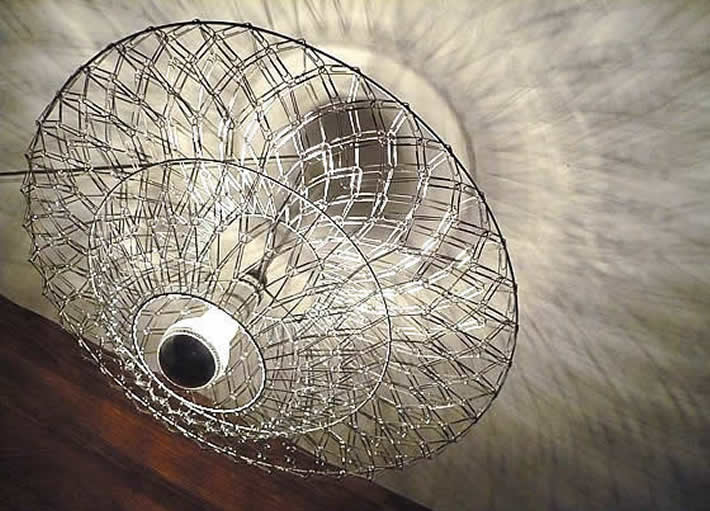
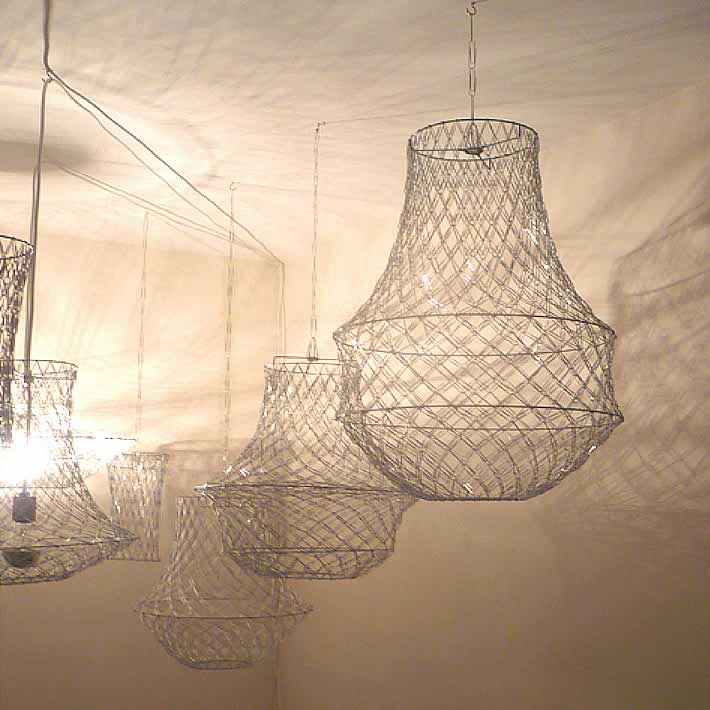
Re:Design Technologies, based in Merrit, British Columbia, Canada, created an innovative collection of paper clip chandeliers that reimagine what’s possible with sustainable design. The beauty of this paper clip chandelier DIY approach lies in its simplicity combined with stunning visual impact. Each chandelier consists of 500 to 2,000+ individual paper clips carefully interwoven together to create intricate patterns and light-diffusing shapes.
What Makes This Project Special
What truly sets this project apart is how it celebrates upcycling at its finest. The foundation of each chandelier uses stainless steel frameworks sourced from collected vintage lamp shades and other used lighting fixtures. Rather than throwing away old lamps, the designers strip away the acrylic, fabric, glue, and accumulated dust to reveal the beautiful steel structure underneath. This becomes the armature for your paper clip chandelier.
Materials You’ll Need
- 500-2,000+ paper clips (standard office style works great)
- Vintage or used lamp shade frame (the steel structure)
- Strong craft glue or jewelry epoxy
- Lighting kit with socket and cord
- Paint or finishing supplies (optional)
How to Create Your Own Paper Clip Chandelier
Building your paper clip chandelier DIY masterpiece is a meditative, creative process. Start by selecting your steel frame—perhaps an old lamp shade you’ve been meaning to upcycle. Clean away any remaining fabric, acrylic panels, and debris to expose the beautiful underlying structure. This skeleton becomes your canvas.
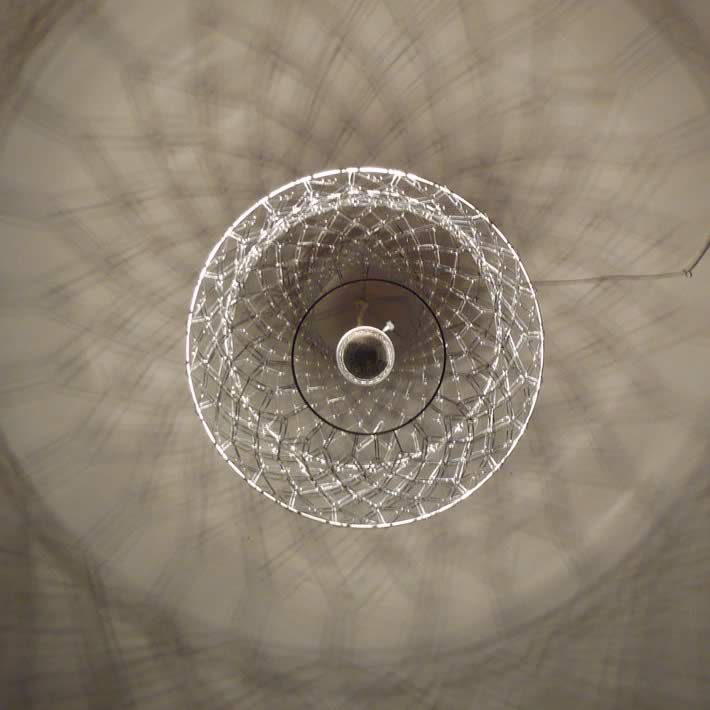
Next, gather your paper clips. You can use standard silver paper clips, or if you want to add color and personality, mix in colored varieties. The interwoven pattern is where the magic happens. Work systematically through the frame, linking paper clips together to create flowing designs. Some prefer geometric patterns, while others opt for more organic, flowing arrangements. There’s no wrong way to do this—let your creativity guide you.
Tips for Success
- Sort paper clips by color before starting for easier planning
- Work in sections to maintain consistency across your design
- Use a strong adhesive at connection points for durability
- Consider the light diffusion—denser areas create interesting shadows
- Test your design before permanently gluing anything
The Sustainable Design Philosophy
This paper clip chandelier project embodies sustainable living by repurposing materials that would typically end up in landfills. Old lamps, forgotten paper clips, and discarded hardware transform into functional art. The result is a conversation piece that tells the story of thoughtful upcycling and environmental consciousness. It’s DIY home décor at its most meaningful.
Display Your Creation
Once your paper clip chandelier is complete, the real joy begins. Hang it in your entryway, dining room, or bedroom to create ambient lighting that’s uniquely yours. The way light filters through the interwoven paper clips creates beautiful, ever-changing patterns throughout the day and night. It’s a reminder that sustainable design doesn’t mean sacrificing beauty—in fact, upcycled pieces often become the most striking focal points in a home.
Whether you’re a seasoned DIY enthusiast or exploring upcycling for the first time, this paper clip chandelier project is accessible, rewarding, and wonderfully sustainable. So gather your materials, find an old lamp frame, and get ready to create something truly special.
Design by The Flying Fox Art and Design
Since you’re here …
I have a small favor to ask. Thousands are visiting upcycleDZINE for upcycle design inspiration every month. Readers in more than 100 countries around the world are now able to support financially.
upcycleDZINE is a completely independent niche site, is very work-intensive, and offers tons of unique information for free.
To keep upcycleDZINE running, I’m asking you for your support.
Your contribution will allow me to:
– meet the hosting costs
– upgrade to keep track of traffic increases
– add new content, and keep improving the older content
– add new functionalities to this site
– improve how it works and how it looks
– and last but not least, my daily dose of coffee 🙂
Again, all contributions will be reinvested into the aforementioned associated costs of running this blog and will help ensure the ongoing quest for quality upcycle design.
Your kindness and generosity will be greatly appreciated and will give me the motivation to continue.
Every contribution, however big or small, is so valuable for the future of upcycleDZINE.
Support today from as little as $2 – it only takes a minute. Thank you.


Bonjour,
superbe votre suspension!!!en tronbone!!!