


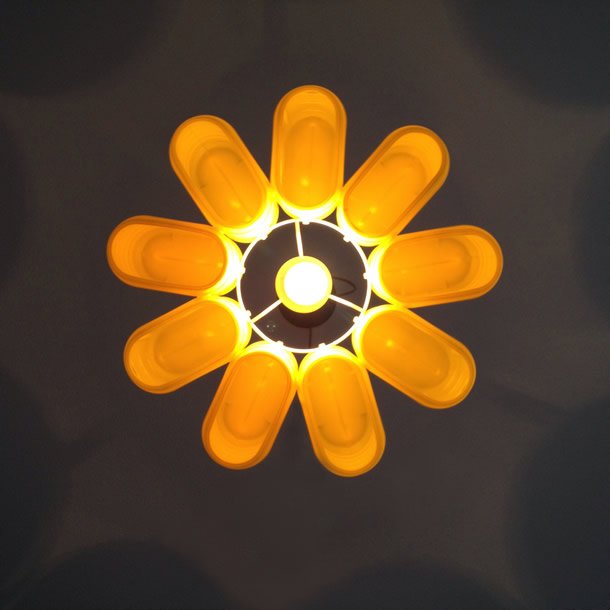
To start of this new year I’m featuring a new upcycle design lampshade I made, the ‘ChocoDaisy’. I’ve tried lots of designs using these unique Nesquik chocolate powder containers. None of them gave me the result I was looking for. I wanted the design to be simple. It is a matter of trying and keep on trying. The thing is, afterwards, when you look at the design, it doesn’t look difficult at all.
Photos © Gilbert de Rooij
How to upcycle chocolade powder containers
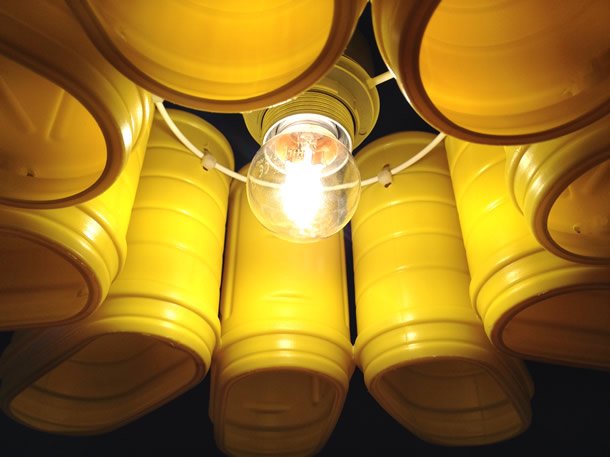
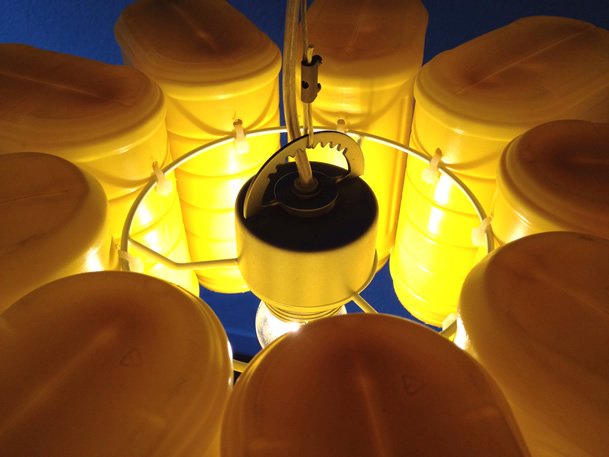
It started all with 9 Nesquik containers. First I ripped off the labels and the yellow container showed something I had not noticed yet. Three of them had a different shape pressed into two sides. These containers had an X shape pressed into them and the others horizontal lines. After removing the glue used for the labels, the containers were cleaned.
Next it was time to mark the spots where I had to drill holes. There are two sets of holes, one set to attach a container to another. Second, a set of holes for attaching the containers to the frame. The first set is drilled near the top of the container, near the point where the lid closes. The second set is drilled at about 3,5 cm. from the bottom. After drilling the holes I divided the different [with and without X] containers around a 15 cm. lampshade frame. Then I used tie-wraps to attach the containers to the frame and then to each other. And that’s it.
Well all in all it’s a reasonable easy lampshade to make.
What you’ll need:
- Nesquik chocolate powder container, 9 pieces
- Scissors
- Drill bit, steel nr. 5
- Lamp frame [in this case 15 cm. diameter]
- Tie-wraps, 20 cm. / ± 3 mm.
Please share your result and/or findings with me.
Have fun!
Design and DIY by Gilbert de Rooij
Since you’re here …
I have a small favor to ask. Thousands are visiting upcycleDZINE for upcycle design inspiration every month. Readers in more than 100 countries around the world are now able to support financially.
upcycleDZINE is a completely independent niche site, is very work-intensive, and offers tons of unique information for free.
To keep upcycleDZINE running, I’m asking you for your support.
Your contribution will allow me to:
– meet the hosting costs
– upgrade to keep track of traffic increases
– add new content, and keep improving the older content
– add new functionalities to this site
– improve how it works and how it looks
– and last but not least, my daily dose of coffee 🙂
Again, all contributions will be reinvested into the aforementioned associated costs of running this blog and will help ensure the ongoing quest for quality upcycle design.
Your kindness and generosity will be greatly appreciated and will give me the motivation to continue.
Every contribution, however big or small, is so valuable for the future of upcycleDZINE.
Support today from as little as $2 – it only takes a minute. Thank you.


Finally! I have been looking for ideas to use these sturdy containers. I can not bear to part with such a box. I have used them for desk supplies, craft supplies, potted plants. and a myriad of things but I always wanted to create something with them. Thank you, fine job.
Dee, thank you for your comment. Hope you’ll create a great looking lampshade. If it works out, maybe you could send me the end result? Would love to see it. Success!